
SAML Single Sign-On Setup with Express and Passport
Antonio Gioia, 2020

In this short guide about SAML authentication on an Express-based web app, I’m going to show how to implement a basic setup using Passport, the authentication middleware for Node.js.
What is the SAML protocol?
The Wikipedia page about SAML states: ”Security Assertion Markup Language is an open standard for exchanging authentication and authorization data between parties, in particular, between an identity provider and a service provider”. In other words, a user can use a single login (username and password) for two different applications, for example, to log into their university and your app with the same credentials.
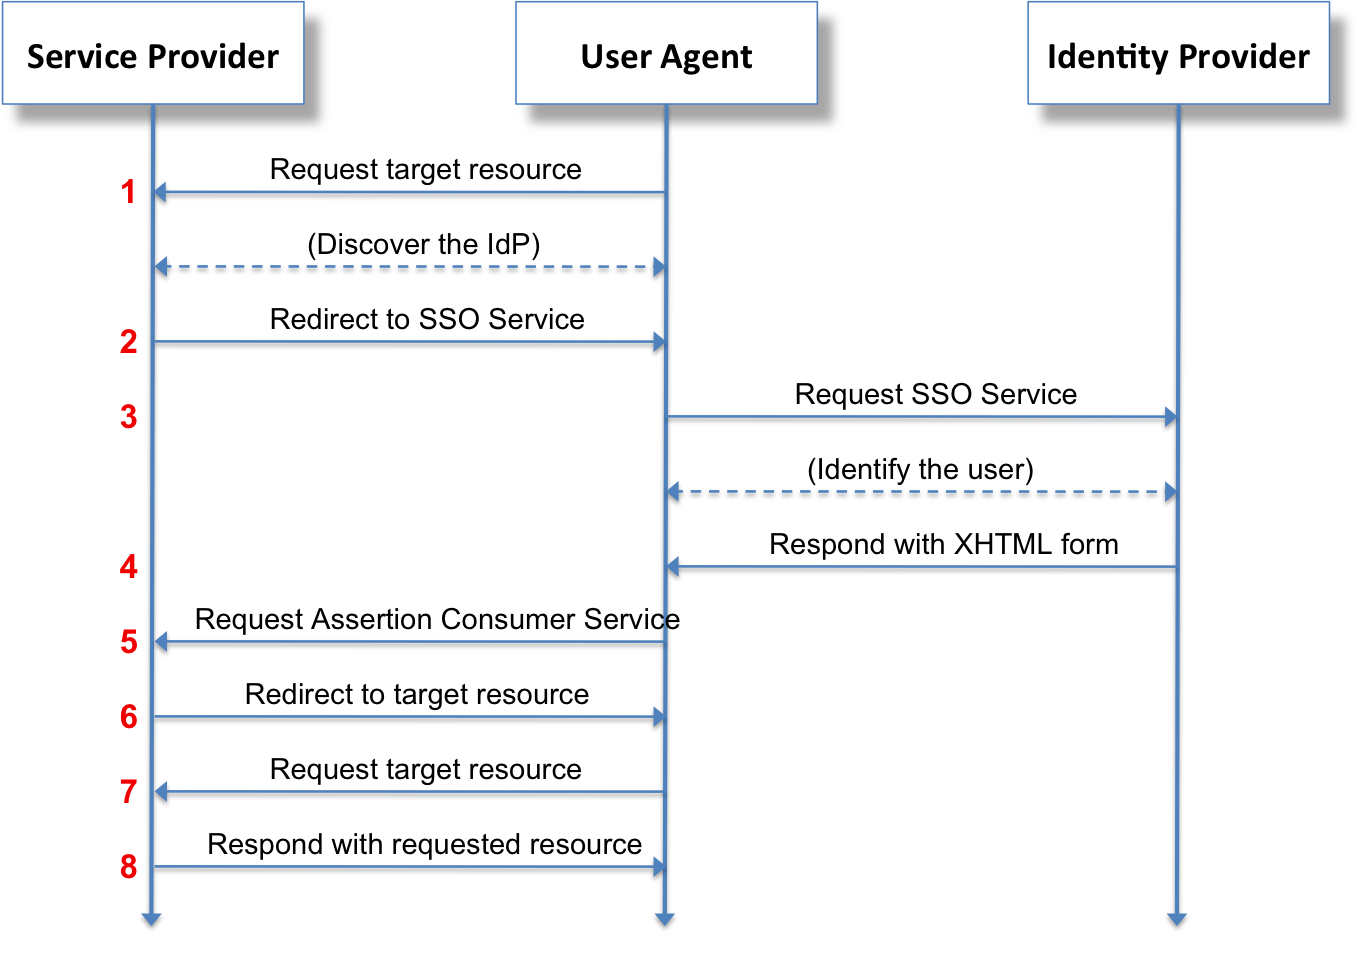
On your app (Service Provider), you have to create a route that Passport will automatically redirect to the Identity Provider login page (in our example, the university login page). A user would then log in with their student credentials provided by the university (Single Sign-On) and then get redirected to your app, authenticated and authorized.
For this to work, both parties (Service Provider and Identity Provider) must coordinate to configure the parts that are going to exchange the XML-based security assertions. A successful exchange returns to your backend a JSON object with some information, one of which is the email address of the student. You have to use that piece of information to check if you already know the user and finally give access to content or, if it’s a new user, to complete registration. You are not going to save the password of a user logged in via SAML because the authentication is managed by the Identity Provider.
Example of SSO with Express and Passport
Our setup includes Express as the web server and Passport as the authentication middleware. For a basic Service Provider configuration, you need:
- Your cert keys
- Identity Provider metadata page
- Identity Provider entry point URL
And you, as the Service Provider, have to provide to the Identity Provider:
- Your metadata page
- Your callback URL
Create cert keys
Open a terminal, create a certs folder, and create your keys with OpenSSL:
mkdir certs
openssl req -x509 -newkey rsa:4096 -keyout certs\key.pem -out certs\cert.pem -nodes -days 900
The Identity Provider has to give you the address of their metadata page, an endpoint for an XML document with various details needed by SAML to verify assertions. You also need to know the entry point URL, which is the actual page on the Identity Provider website where the user will type their credentials to log in. On the Identity Provider metadata page, you can find the public key that you need to have on your server. Find the tag X509Certificate, copy the content into a file named idp_key.pem, and save it in the certs folder.
Create your Service Provider metadata page
As a Service Provider, you need to create a metadata page too; the Identity Provider will need it to configure their endpoint. We will use passport-saml as the SAML authentication provider for Passport. You can install it with npm and require it together with passport in your Express app.
const passport = require("passport");
const saml = require("passport-saml");

app.route("/metadata").get(function(req, res) {
    res.type("application/xml");
    res.status(200);
    res.send(
    samlStrategy.generateServiceProviderMetadata(
        fs.readFileSync("./certs/cert.pem", "utf8"),
        fs.readFileSync("./certs/cert.pem", "utf8")
    )
    );
});
Now if you open the route /metadata on your app, you should see an XML document with your public key exposed.
We can now configure two more routes: the first will automatically redirect a user to the Identity Provider entry point, and the second, where we receive the response, will be called by the Identity Provider application soon after the user is authenticated on their server.
app.route("/login-idp").get(passport.authenticate("samlStrategy"));
app.route("/login-idp/callback").post(samlCallback(passport));
We now have to define the SAML strategy for both routes.
Configure SAML strategy and session
We can define a SAML strategy with a new instance of Strategy from passport-saml:
const samlStrategy = new saml.Strategy(
    {
        callbackUrl: "/login-idp/callback",
        entryPoint: "https://idp.webapplication.com/idp/profile/SAML2/Redirect/SSO",
        issuer: "mywebapp-saml",
        decryptionPvk: fs.readFileSync("./certs/key.pem", "utf8"),
        privateCert: fs.readFileSync("./certs/key.pem", "utf8")
        // more settings might be needed by the Identity Provider
    },
        function(profile, done) {
        return done(null, profile);
    }
);

passport.use("samlStrategy", samlStrategy);
The two arguments are a configuration object and a function that returns a profile object. More details about the configuration can be found on the passport-saml GitHub page. The entryPoint key is a URL provided by the Identity Provider, and the issuer key is a string that identifies your request on the Identity Provider side.
Now we need to define the callback function for the POST request arriving from the Identity Provider application at "/login-idp/callback", assuming the response contains a key email that identifies the user:
const samlCallback = function(passport) {
    return function(req, res, next) {
        passport.authenticate("samlStrategy", function(err, user, info) {

            const email = user.email;

            // check in database if user with that email exists
            // ...

            // if exists show content for registered users:
            req.login(user, function(err) {
                return res.redirect("/my-contents-page");
            });

            // application logic code
            // ...

            // if doesn't exist redirect to complete registration page
            req.login(user, function(err) {
                return res.redirect(
                    "/complete-registration"
                );
            });

        })(req, res, next);

    };
};
req.login (together with req.logout) is the Passport function that takes care of establishing a login session in our Express app. A popular middleware to handle sessions on Express is express-session. We can use it in our app together with cookie-parser to keep track of user authentication with cookies:
const session = require('express-session');
const cookieParser = require('cookie-parser');

app.use(cookieParser());

app.use(session({
    secret: "secret",
    resave: false,
    saveUninitialized: true,
    cookie: { maxAge: 7 * 24 * 60 * 60 * 1000 }, // 7 days
    store: [...] // save on database
}));
Check the express-session documentation for more information.
Links
- Security Assertion Markup Language on Wikipedia
- Setup a Single Sign On SAML Test Environment with Docker and NodeJS
- Passport-SAML package
Notes
Feel free to save or share this article. If you notice a mistake or want to contribute to a revision of the article, please contact me at info@antoniogioia.com.


